
Engaging customers with personalized, timely communication is key to building strong relationships in Salesforce. Using Message Blink, a native Salesforce SMS and WhatsApp app, you can craft dynamic SMS templates to connect with Leads, Contacts, and other records.
This guide provides detailed, Salesforce-focused steps to create personalized SMS templates, optimized for readability and maximum engagement.
Steps to Create Personalized SMS Templates
-
Install Message Blink from Salesforce AppExchange:
- Log in to your Salesforce org via login.salesforce.com using your admin credentials.
- Navigate to the Salesforce AppExchange
- Search for Message Blink in the AppExchange search bar.
- Click on the Message Blink app listing, then select Get It Now to install it in your Salesforce environment (Production or Sandbox).
-
Access the Message Blink Template Library:
- From the Salesforce homepage, click the App Launcher
- Search for and select the Message Blink app.
- In the Message Blink app, locate the Templates tab (typically found in the top navigation or sidebar).
- This tab displays the template library, where you can view, create, edit, or delete SMS and WhatsApp templates.
-
Create a New SMS Template:
- In the Templates tab, click the New Template button.
- Select the Salesforce Object: Choose the object the template will apply to, such as Contact, Lead, Account, Opportunity, or a custom object (e.g., Order__c).
- Name the Template: Enter a unique, descriptive name, such as “Welcome Message for New Leads” or “Order Confirmation SMS,” to easily identify its purpose.
- Set Template Type: Select SMS as the template type (Message Blink also supports WhatsApp templates, but this guide focuses on SMS).
- Optionally, add a description to document the template’s use case (e.g., “Sends confirmation SMS after order placement”).
-
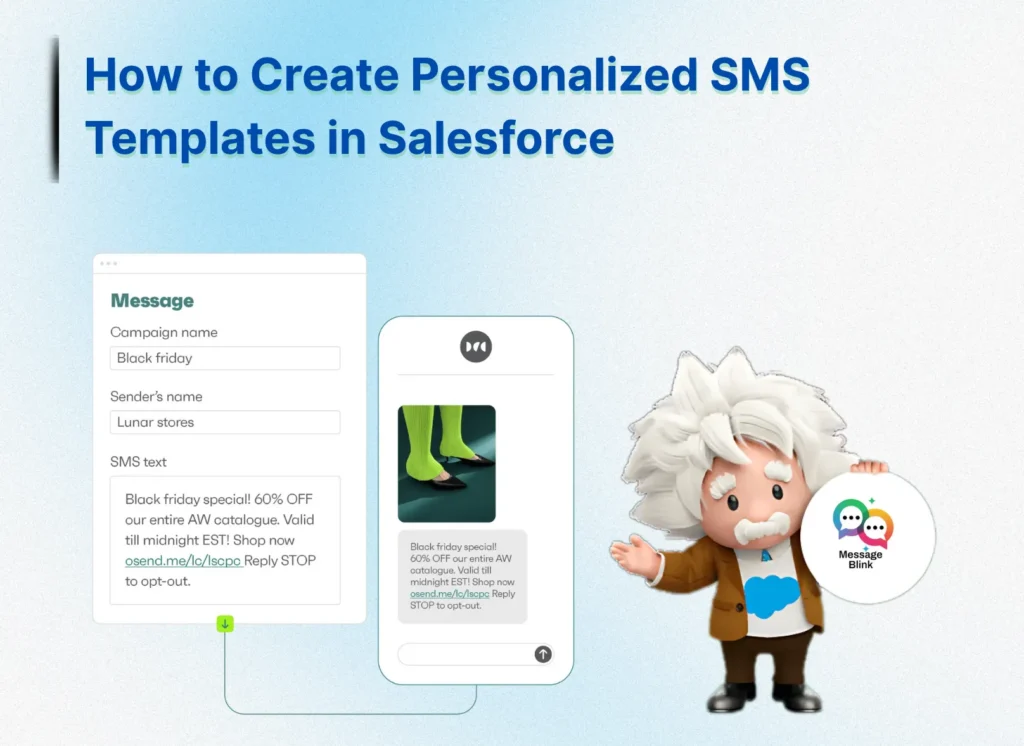
Compose the SMS with Merge Fields:
- In the template editor, write a concise message, ideally within 160 characters for standard SMS (Message Blink supports concatenated messages for longer texts, up to 306 characters).
- Use merge fields to personalize the message with dynamic data from Salesforce records. Examples include:
- {{Contact.FirstName}}: Pulls the recipient’s first name.
- {{Lead.Company}}: Pulls the company name from a Lead record.
- {{Order__c.OrderNumber__c}}: Pulls a custom field from a custom object.
- {{User.Phone}}: Pulls the sender’s phone number.
- To insert merge fields:
- Click the Merge Field dropdown or button in the Message Blink template editor.
- Select the desired field from the list of available fields for the chosen object.
- For cross-object fields (e.g., pulling Account data into a Contact template), navigate through related objects in the dropdown.
- Example template:
Hi {{Contact.FirstName}}, your order #{{Order__c.OrderNumber__c}} is confirmed for {{Order__c.DeliveryDate__c}}. Reply Y to confirm or call {{User.Phone}}. STOP to opt out.
- Set default values for merge fields to handle missing data:
- In the template editor, click the merge field and specify a fallback (e.g., {{Contact.FirstName | Customer}} displays “Customer” if the first name is blank).
- Ensure the message includes a clear call-to-action (e.g., “Reply Y”) and compliance text (e.g., “STOP to opt out”).
-
Save and Test the Template:
- Click Save to store the template in the Message Blink library.
- Test the template to ensure it works as expected:
- Navigate to a test record (e.g., a Contact or Lead in Salesforce).
- In the Message Blink app, select the Send SMS action (often available on the record’s page layout or via a Message Blink component).
- Choose the newly created template from the template dropdown.
- Send the SMS to the test record’s phone number.
- Verify that merge fields populate correctly (e.g., the recipient’s name and order details appear as expected).
- Check Message Blink’s delivery logs to confirm the message was sent successfully.
-
Automate Template Usage with Salesforce Flows:
- Automate SMS sending using Salesforce Flow to trigger messages based on events:
- Go to Setup in Salesforce and search for Flows.
- Create a new Record-Triggered Flow:
- Select the object (e.g., Order__c for order confirmations).
- Set the trigger (e.g., “A record is created or updated” with conditions like Order__c.Status__c = ‘Shipped’).
- Add an Action element and search for Message Blink Send SMS.
- Configure the action:
- Select the template from the Message Blink library.
- Map the record ID to the action to pull data for merge fields.
- Save and activate the Flow.
- Example use case: Automatically send an SMS when an order’s status changes to “Shipped.”
- Test the Flow by updating a record to trigger the SMS and verify delivery.
-
Track and Optimize Performance:
- Access Message Blink’s Analytics Dashboard from the app’s main interface.
- Monitor metrics such as:
- Delivery Rate: Percentage of messages successfully delivered.
- Response Rate: Percentage of recipients replying (e.g., with “Y” or “STOP”).
- Click-Through Rate: If the SMS includes links (e.g., for promotions).
- Review recipient responses in the Message Blink conversation view to identify trends (e.g., common replies or opt-out requests).
- Refine templates based on performance data, such as shortening messages or adjusting merge fields for better engagement.
Best Practices
- Concise Messaging: Keep SMS under 160 characters for clarity, with a strong call-to-action (e.g., “Reply Y to confirm”).
- Strategic Personalization: Use merge fields for relevant details (e.g., {{Contact.FirstName}} or {{Order__c.DeliveryDate__c}}) but avoid cluttering the message.
- Regulatory Compliance: Include opt-out instructions (e.g., “Reply STOP to opt out”) to comply with regulations like TCPA. Message Blink automatically updates the “Opt-out” field in Salesforce when recipients opt out.
- Test Across Use Cases: Create templates for various scenarios:
- Lead follow-up: Hi {{Lead.FirstName}}, let’s discuss your needs! Book a call: {{Link}}.
- Appointment reminders: {{Contact.FirstName}}, your appt is on {{Appointment__c.Date__c}}. Reply Y to confirm.
- Promotions: {{Contact.FirstName}}, save 20% with code SAVE20 until {{Promotion__c.EndDate__c}}! {{Link}}
- Time Zone Awareness: Use Message Blink’s scheduling features to send SMS at appropriate times based on recipient time zones.
Conclusion
Creating personalized SMS templates in Salesforce with Message Blink is a powerful way to engage customers with tailored, automated messages. By following these detailed steps, you can streamline communication, boost open rates (up to 98%), and drive conversions.
Get started with Message Blink on the Salesforce AppExchange or visit www.messageblink.com for more details.